
Business Rules for Accessibility
*Please note, these rules apply for all new polices, revisions/reviewed policies, and rescinded policies.
- Font and Size and spacing rules
- Century Gothic Font (san serif) at 12 point
- Avoid use of Italics. If need to show emphasis, use bold
- Black font on white background
- Insert page numbers on lower right (if more than 1 page)
- Set spacing to 1.5 lines (minimum) throughout the document. Extra spacing is acceptable.
- Maintain “normal” margins. If something looks off, check the various layout settings of the page (margins and indents).
- Policy Document Must be Saved to the Hard Drive
- Once the Policy Document has been completed, be sure to save the Word Document to
your Hard Drive not your OneDrive/Teams Page/other document management system. This is extremely important
for future uploading processes and maintaining the flow of the public facing site
from the Policy Library.
- Please see notes on Business Rules for Uploading Policies to the Policy Library for a detailed step-by-step guide
- Once the Policy Document has been completed, be sure to save the Word Document to
your Hard Drive not your OneDrive/Teams Page/other document management system. This is extremely important
for future uploading processes and maintaining the flow of the public facing site
from the Policy Library.
- Assign Properties to Ensure Accessibility
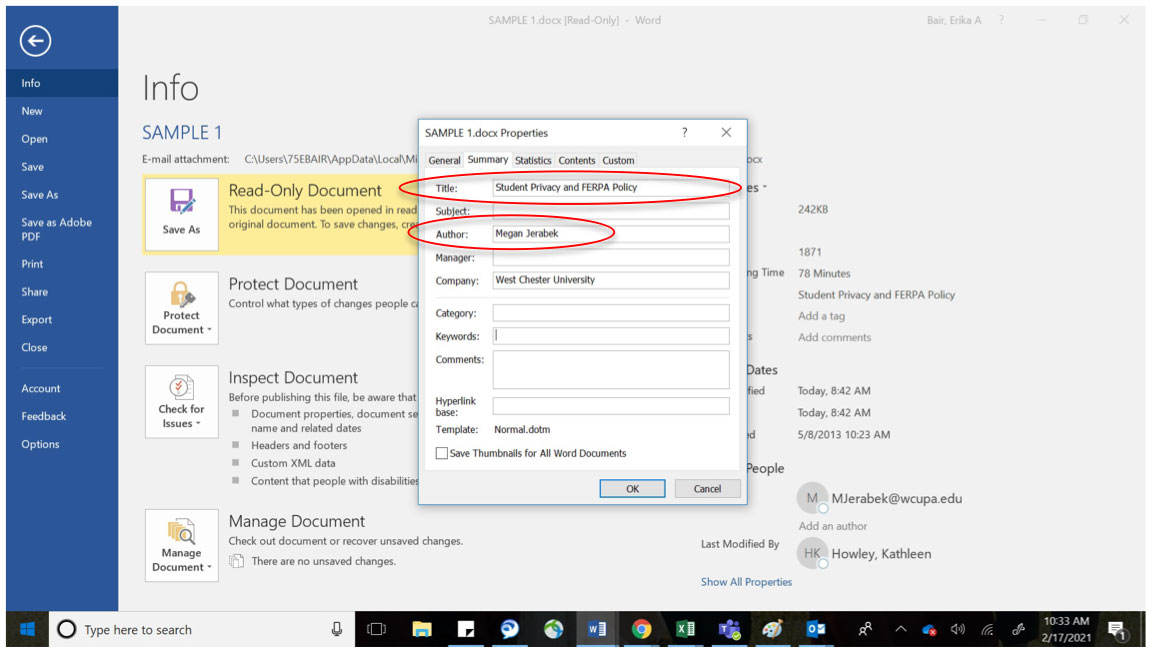
- To ensure accessibility remains intact upon conversion from WORD to PDF, the WORD document must be given a Title and an Author – this is different than the name a document receives when it is “Save As” to your computer/drive/etc. and should be looked at as properties of the document. This additional step of assigning properties to the document is a standalone step that allows the flow of the Intranet to Public Facing site to maintain accessibility. See the following pages for an illustrated “How to” for assigning these properties.
- Only an Author and Title need be assigned (ignore the other boxes/fields)
- Title shall be filled in with the policy name as it should appear on the Public Facing Website.
- Author shall reflect the individual making revisions/rescinding the document.
- When entering a digital signature, text box (for rescinded policies), or other image
- The application of “Alt Text” is necessary to assist accessibility readers where said signatures, rescinded text boxes (both considered to be images), or other images exist. Each image requiring “Alt Text” will need to apply supplemental text, these steps and specific details for entry can be found in the following “How to” for applying necessary “Alt Text.”
How to Apply Title and Author to Document (ignore the other fields)
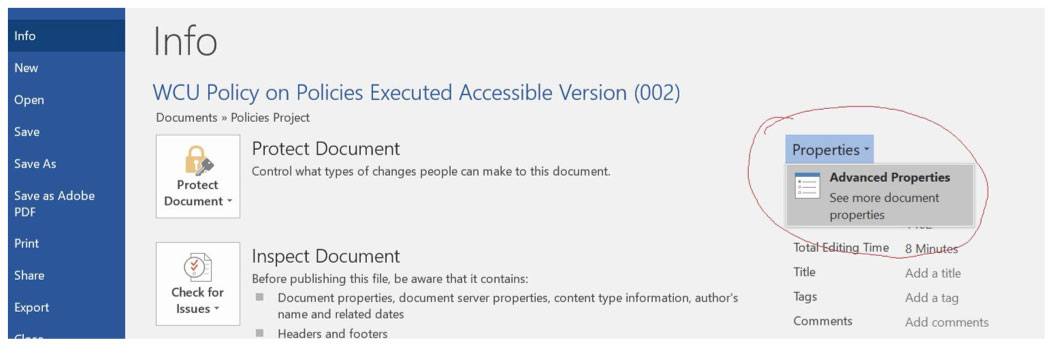
- Click File → Select Properties → Select Advanced Properties
- Input Title (Policy Name as it appears on public facing website) and Author (if not
already autogenerated) → OK
How to Apply “Alt Text” for Digital Signatures, Rescinded Text Boxes, & Other Images
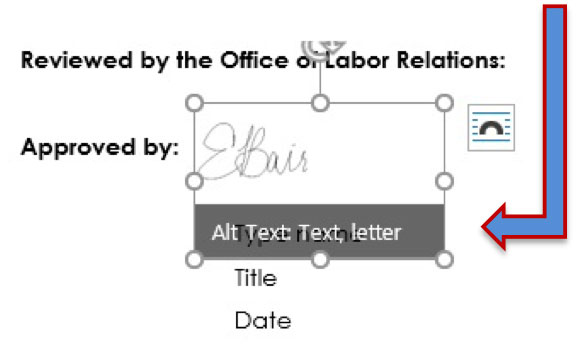
- If you are using the most updated version of Word, as soon as you insert the signature/image,
a gray bar will appear below the inserted image prompting you to add alt text. Click
on this gray bar.
- If you are using an older version of Word and the above prompt does not automatically
occur, you should right click on the digital signature/rescinded text box/image and one of the 2 views (seen below) will show for you. Select the one that applies and follow to step 2.
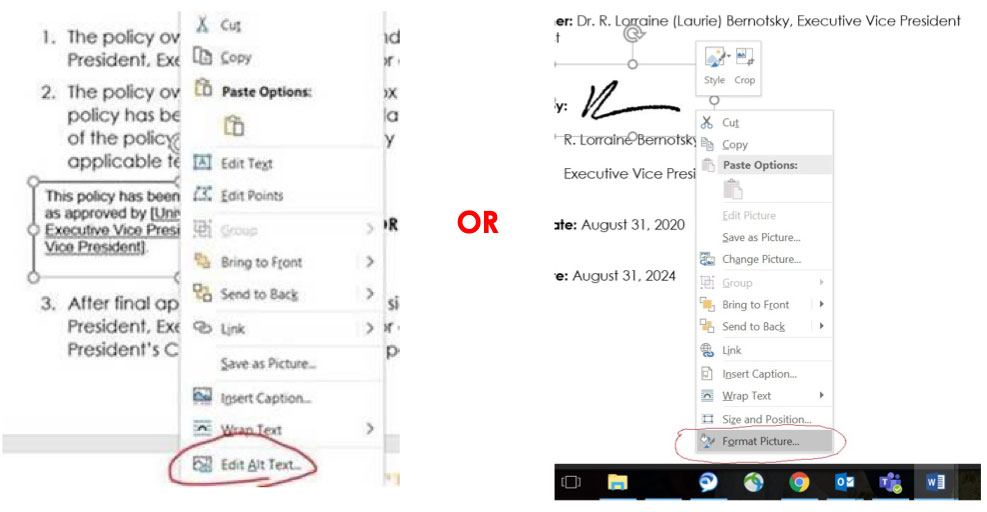
- If you are using an older version of Word and the above prompt does not automatically
occur, you should right click on the digital signature/rescinded text box/image and one of the 2 views (seen below) will show for you. Select the one that applies and follow to step 2.
- The image below will appear on the right-hand side of your screen. Think about what
you are applying the Alt Text for.
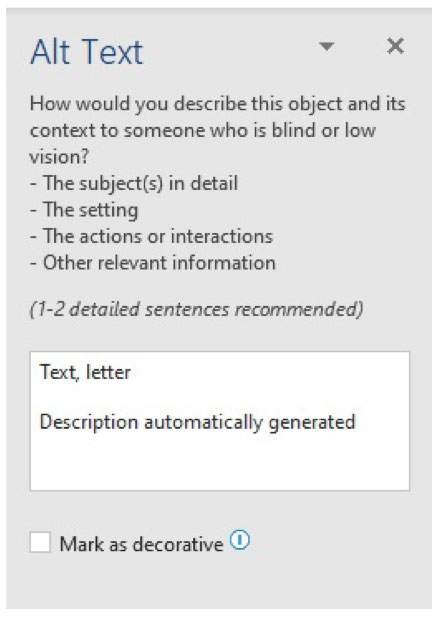
For Digital Signatures:
- Title: Individuals title @ time of approval – not a name.
- Description: “Individual’s Name Signature”
For Rescinded Text Box:
- Check the “Mark as decorative” box.
For Other Images:
- Input brief description of image, for example if the image is the University Logo, you would type “WCU Logo, ” if it were an image of the University Seal, you would type in “WCU University Seal.”