

Class Registration: Register for Classes
This guide explains how to register for classes in RamPortal.
| Contents |
|---|
| Navigation |
| Search for Classes |
| Register for Classes |
| Waitlist |
| Registration Errors |
| Related Guides |
Before You Begin
Complete the Financial Terms and Conditions Agreement
Before you can register for classes, you must review and accept the Financial Terms and Conditions Agreement. If you have not completed the agreement, the Register for Classes card will display a Financial Terms & Conditions button instead of your registration information (Fig 1).
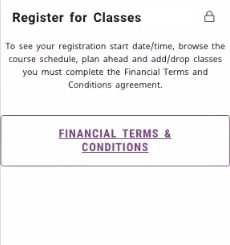
Fig 1
Note: After you accept the agreement, the card will update to display the Register button and your Registration Date/Time (Fig 2). If the card does not update after a few moments, refresh your browser by clicking on your browser’s refresh button.
Visit Financial Terms and Conditions: How to View and Accept for additional instructions.
Check Your Registration Dates
Verify that your registration window is open.
- Login to RamPortal using your WCU Single Sign On (SSO).
- Locate the Register for Classes card on your home page (Fig 2).
- This card displays your registration window for the upcoming semester.
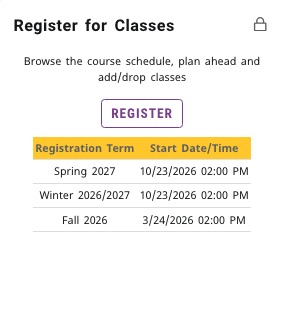
Fig 2
Note: If you do not see a Registration Start Date/Time that may mean your graduation date is prior to the registration term and your expected graduation term may need to be updated. Submit a Change of Graduation Term request for review by the Registrar’s Office.
Navigation
- Locate the Register for Classes card on your RamPortal home page and click on the Register button (Fig 2).
- Select the term in the dropdown and click continue.
- Choose Register for Classes (Fig 3).
Note: If your registration window is not open, select Browse Classes to view available courses.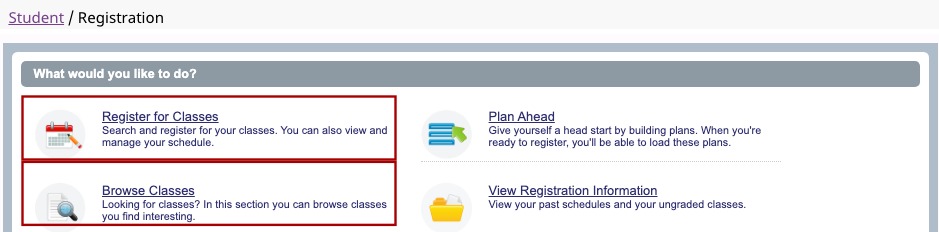
Fig 3
Search for Classes
- On the Find Classes tab, enter your search criteria. Here are some examples of search
criteria to narrow your results. You can use one or multiple at the same time to
refine your results.
- Subject: Enter three-letter course subject code (e.g., ECO, MAT, GEO) and choose from the dropdown list.
- Course Number: Optional but helps narrow results to a specific class.
- Campus: Allows to filter campus location or online.
- Attribute: Use to search for General Education classes that meet program requirements. For example, selecting Arts Distributive Requirement will display all the classes offered in the selected semester that will fulfill the Art General Education requirement.
- Advanced Search:
- Meeting Days and Time: Filter to match your availability.
- Instructor: Search for classes taught by a specific faculty member.
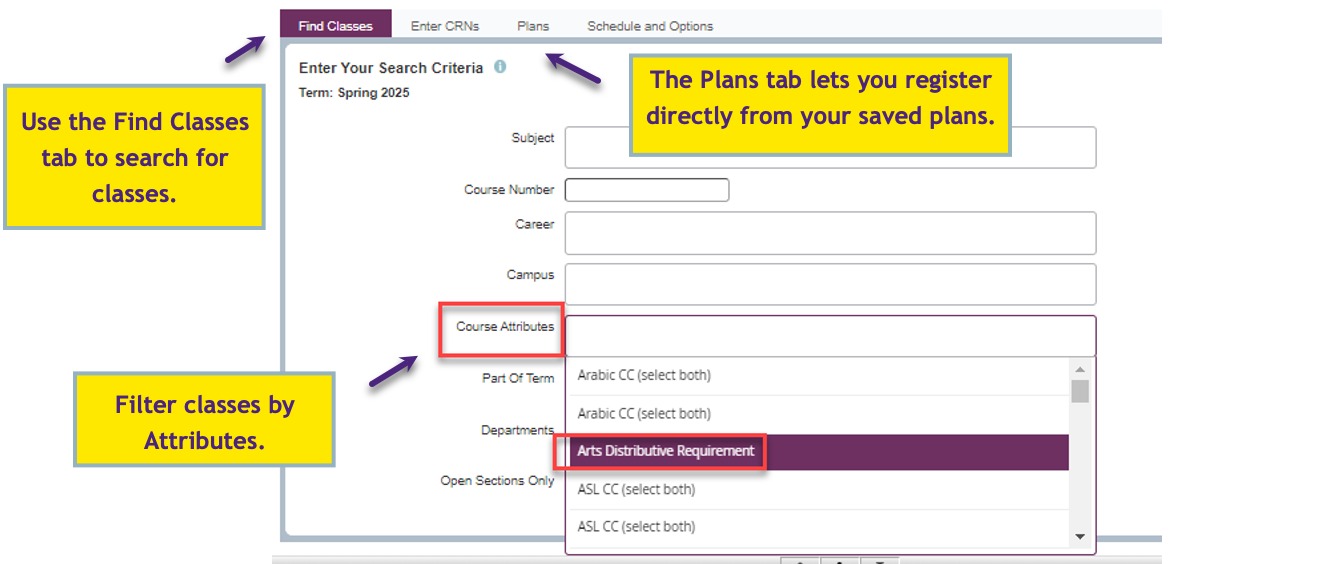
Fig. 4: Class Search Screen showing how to filter by Course Attributes.
- Click Search
- Review results:
- The Enrl Totals column shows how many seats and waitlist availability.
- A red FULL icon indicates the class is closed. Some closed classes may have a waitlist you
can join. See the Waitlist section below for detailed instructions.
- Hover over icons for details, such as reserved seating and remaining waitlist spots.
- The Enrl Totals column shows how many seats and waitlist availability.
Register for Classes
Note: If you created a Registration Plan, you can select it from the Plans tab (Fig. 5) and register for all planned classes at once. See Class Registration: Registration Plans for detailed instructions.
- Click the Add button on the far-right side of the row for the section you want. This moves the class down to your Summary panel. If you don’t see the Add button, scroll all the way to the right or zoom out.
- In the Summary panel at the bottom right, review the classes you added. The Status column shows whether a class is Registered, Waitlisted, or Pending. Classes you just added will show as Pending until you click Submit.
- Click Submit in the bottom right corner to complete the enrollment process.
- Review the confirmation message on the screen to confirm your action was successful.
NOTE: Make sure your classes show Registered or Waitlisted before leaving the page.
If a class is Pending, you are not enrolled.
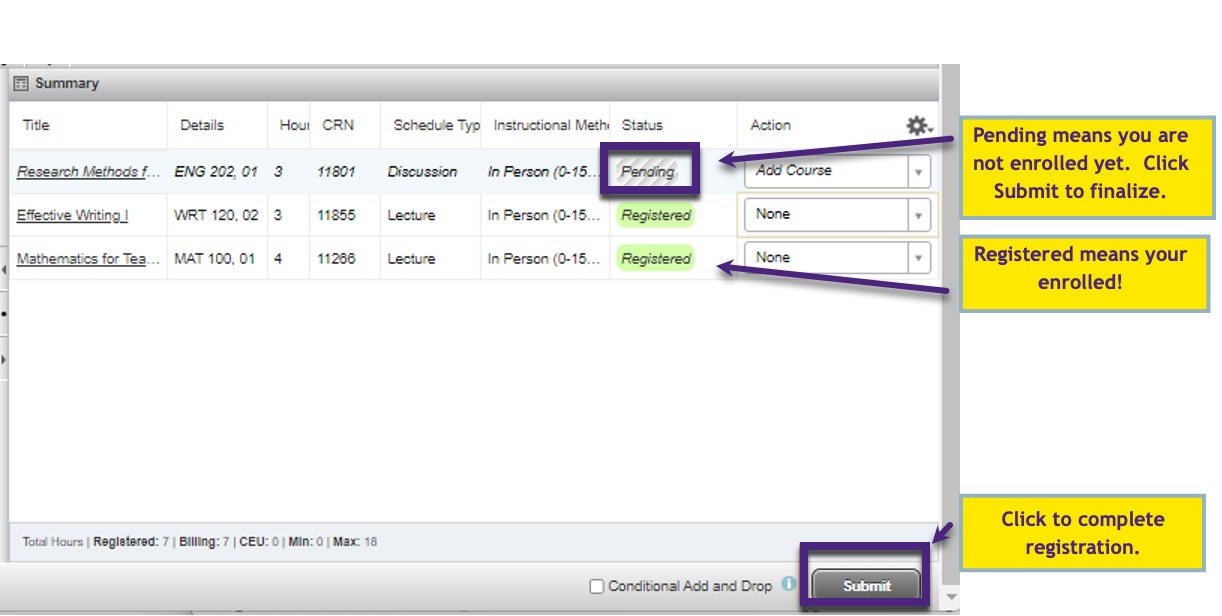
Fig. 5: Summary panel showing a newly added course with the status of Pending.
Waitlist
If a class is full but has a waitlist, you may have the option to join.
- Add the class so it is displayed in the Summary panel at the bottom right, go to the Action column for that class and choose Add to Waitlist from the drop-down.
- Click Submit. The class will appear in your Summary with a status of Waitlisted.
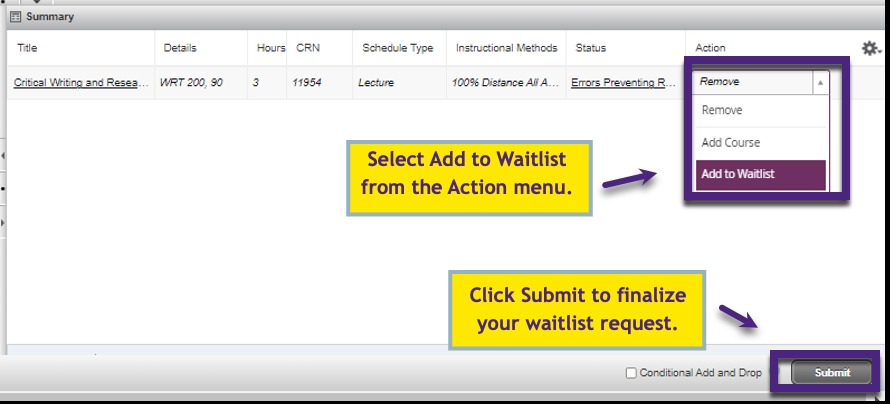
Fig. 6: How to Add to a Waitlist - When a seat becomes available, you will receive an email notification. Login to RamPortal, go to Register for Classes, open the Action dropdown for that class and choose Registered from Waitlist. Click Submit to complete enrollment.
- Verify that the class Status now shows Registered.
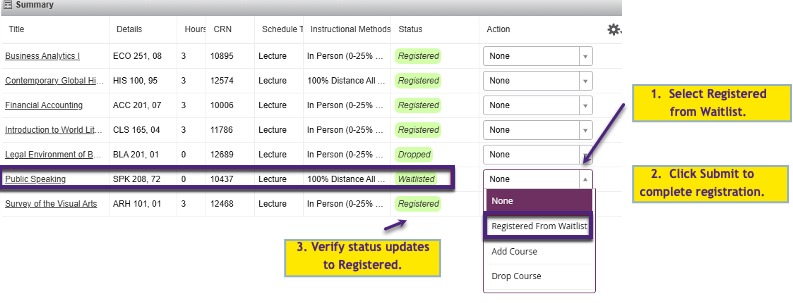
Fig 7: Summary panel showing how to register from a waitlist. - If you no longer wish to remain on the waitlist, use the Action dropdown for that class to select Drop Course and click Submit.
NOTE: Waitlist offers expire after a set period. If you miss the deadline, your seat will be offered to the next student on the list.
For help identifying and resolving common waitlist issues, see the Waitlist Errors and Resolutions webpage.
Registration Errors
If your registration attempt is unsuccessful, the Status column will display an error after you click Submit.
- Hover over the error details to view the explanation. Errors also appear at the top of the page.
- For help identifying and resolving common issues, see Class Registration: Resolve Registration Errors webpage.
- For assistance with Duplicate Course Enrollment, Level Overrides, and Overload Credit Enrollments complete the Registration or Student Records Help form. For all other overrides, please contact the Department offering the class for assistance.
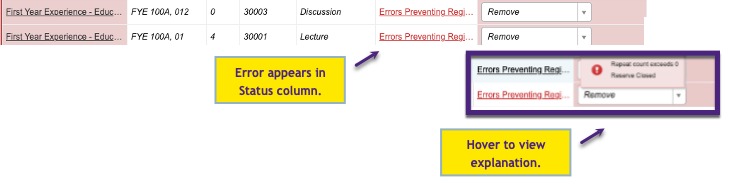
Fig. 8: Registration Error with a hover tooltip explanation.
Related Guides
Related Guides found on the RamPortal Student Training Webpage:
- Class Registration: Registration Plans
- Class Registration: Drop or Withdraw from a Class
- Class Schedule: View Your Classes and Schedule
For support, please submit an AES Support Portal ticket.